Sunday, 24 March 2019
Saturday, 23 March 2019
Bitrate Settings Open Broadcaster Software [OBS]
Posted by free on March 23, 2019 with No comments
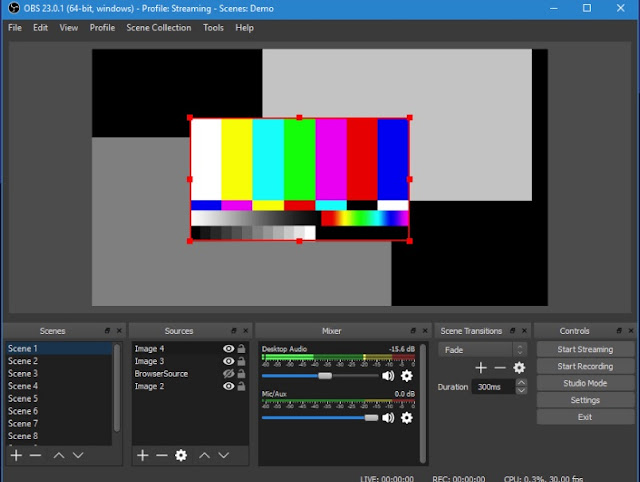 okay the first thing you have to do is Streaming Software that you will use for Live
ok I'm here I'm giving recommendations from Open Broadcaster Software [OBS]
Why ? because according to me this application / software really helps a little light and sure Free hehe: D
You can download the Open Broadcaster Software [OBS] here
- Download S / d Install Software that you just downloaded
- Check the Lu Network at SpeedTest, you can check here
- After you check there will be results like the one below
and open the OBS that you downloaded earlier in ~ Settings> Output as below you just adjust it to the existing bitrate. bro, you entered in the Video Bitrate
well after that you can check and make sure you adjust your Bitrate according to your internet speed
so the conclusion that is used here is the upload or upload it is not the speed download if there are questions or you are confused you can ask in the comments or on the IG / FB I am in the right column: D Thank you
Artikel By Suka Suka Berlie
Monday, 18 March 2019
How to Increase Admob Blog CPC and Google Adsense Youtube
Posted by free on March 18, 2019 with No comments
How to Increase Admob CPC Blog and Youtube - After yesterday discussing the meaning of Google Adsense now we will discuss how to raise Admob CPC Blog and Youtube. CPC or in English CPC means Pay Per Click. Cpc is the amount of money you earn every time a user clicks on your ad.
Hello All Smart
To increase the price of CPC, it is quite difficult, especially for Blog users. The price of this small CPC is caused by the selection of the Niche blog, the name of the admob package, and also the YouTube video content that is used. In addition, it is a factor of the country we use. Indonesia is included in the lowest CPC, which is between Rp.100 - Rp.1000. We can increase the low CPC. Here's how to raise the Admob CPC Blog and Youtube.
How to Increase Admob CPC
To increase the Admob CPC, it's easy enough, first you have to keep on researching admob, you start checking the VPN that is used, whether it's leaking or not. Choose the richest country and have a population that you can read a lot here. List of Richest Countries. Then determine the name of the package interesting applications such as com.bitcoin.tipsku or that blend with insurance, diamonds and electronic goods.
In addition, add impressions to AdMob to find ads that have a high price value in 1 click
How to Increase CPC Blog / Website
To increase the CPC Blog, you have to pay attention to the niche blogs that you fill, focus on 1 niche, for example technology, ads that blend technology will appear like Drone ads, Drone Ads have a high value of about 20k-50k in 1 click. usually that is liked by google adsense
The size of the ad installed on a good blog is usually 300x250. the amount also if the number of ads is too much then the price of the ad will decrease because it is shared with other ads
How to Increase Youtube CPC
Now to increase the CPC Youtube, specify the duration of the video that you will upload, if the video has a duration of more than 10 minutes, then you can place the ad in the video as you like, at what minute is it up to you. Create a video title that can catch the audience so that the audience is interested and watch your video. A video search is still an alternative for visitors to get a video that is expected, if the title of your video appears in the first 10 pages of search, then the chances of visitors to open the video will be even greater.
Sunday, 12 August 2018
Laptop Keeps Disconnecting from WiFi [FIXED]
Posted by free on August 12, 2018 with No comments
If your laptop keeps disconnecting from your WiFi network, you’re not the only one! Many laptop users are reporting that their Internet connection breaks frequently when their laptop is connected to a wireless network.
This is very annoying. It’s very inconvenient that you can’t connect your laptop to WiFi. But don’t worry, your issue can be fixed…
Try these fixes!
The following are a few methods that have helped many laptop users. You may not have to try them all; just work your way down the list until you find the one that works for you.
- Restart your computer and network devices
- Disable your network adapter power saving setting
- Update your network driver
- Change Scan Valid Interval
Method 1: Restart your laptop and network devices
When your laptop keeps dropping out from your wireless network, the first thing you should try is to restart your laptop and router/modem. This helps you reset your network settings and fix your network issues.
To do so:
1) Shut down your laptop, then disconnect the power cable from it.
2) Turn off your router/modem, and then unplug the power cable from them.
3) Leave all your devices for about one minute.
4) Plug the power cables to your laptop and your router/modem.
5) Turn on your router/modem, then your laptop.
Now try connecting your laptop to your wireless network. Hopefully, this fixes your disconnecting issue. But if not, don’t worry. There are still three fixes you can try.
Method 2: Disable your network adapter power saving setting
Your wireless network issue may occur because your system turns off your wireless network adapter to save power. You should disable this setting to see if this fixes your issue.
To check your network adapter power saving setting:
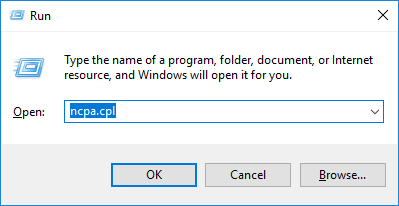
1) On your laptop, press the Windows logo key and R on your keyboard to open the Run box. Then type “ncpa.cpl” and press Enter.
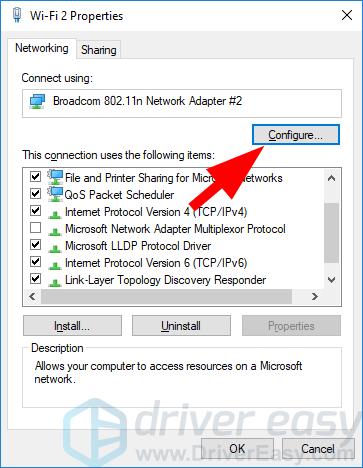
2) Right click your Wireless/WiFi network adapter, then click Properties.
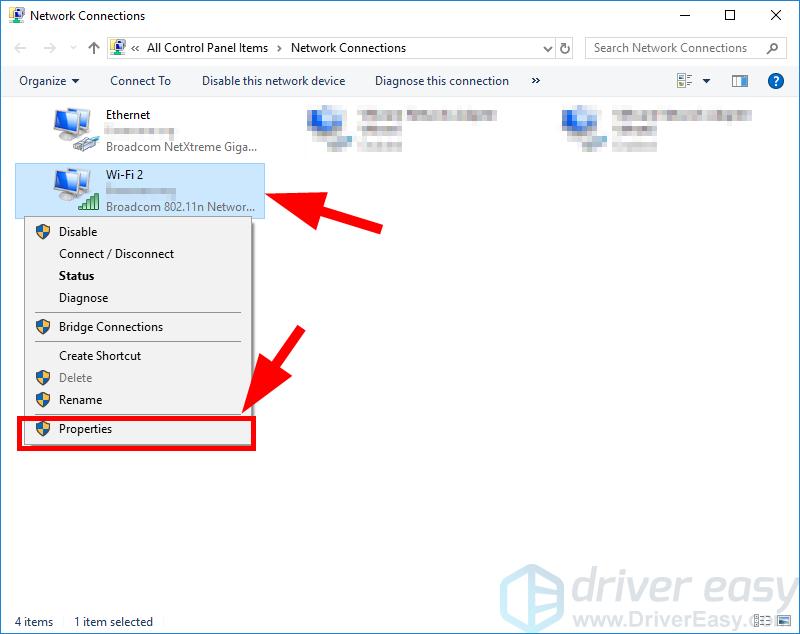
3) Click the Configure button.
4) Select the Power Management tab, make sure Allow the computer to turn off this device to save power is not checked, and then click OK.
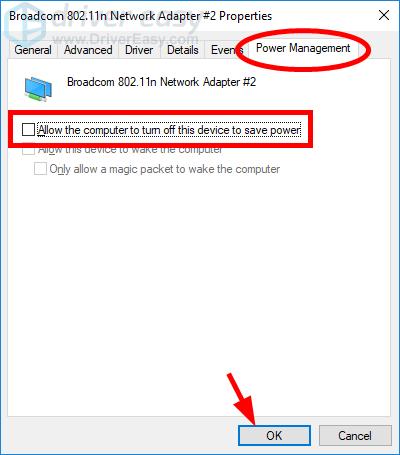
Hopefully, this fixes your wireless connection issue. But if not, you may need to try other fixes listed below.
Method 3: Update your network driver
Your laptop may keep disconnecting from WiFi because you’re using a wrong network driver or it’s out of date. You should update this driver to see if that’s the case for you.If you don’t have the time, patience or skills to update your drivers yourself, you can do it automatically with Driver Easy.
Driver Easy will automatically recognize your system and find the correct drivers for it. You don’t need to know exactly what system your computer is running, you don’t need to be troubled by the wrong driver you would be downloading, and you don’t need to worry about making a mistake when installing.
You can update your drivers automatically with either the FREE or the Pro version of Driver Easy. But with the Pro version it takes just 2 steps (and you get full support and a 30-day money back guarantee):
We recommend you use a network (Ethernet) cable to connect your laptop to the Internet so you can download your driver. But if you don’t have one, you can use the offline scan feature of Driver Easy to update your network driver.
1) Download and install Driver Easy.
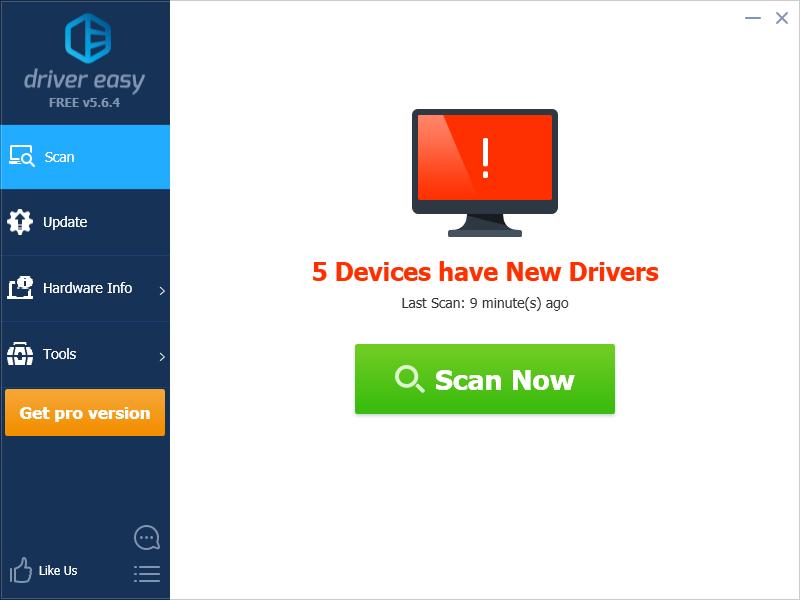
2) Run Driver Easy and click the Scan Now button. Driver Easy will then scan your computer and detect any problem drivers.
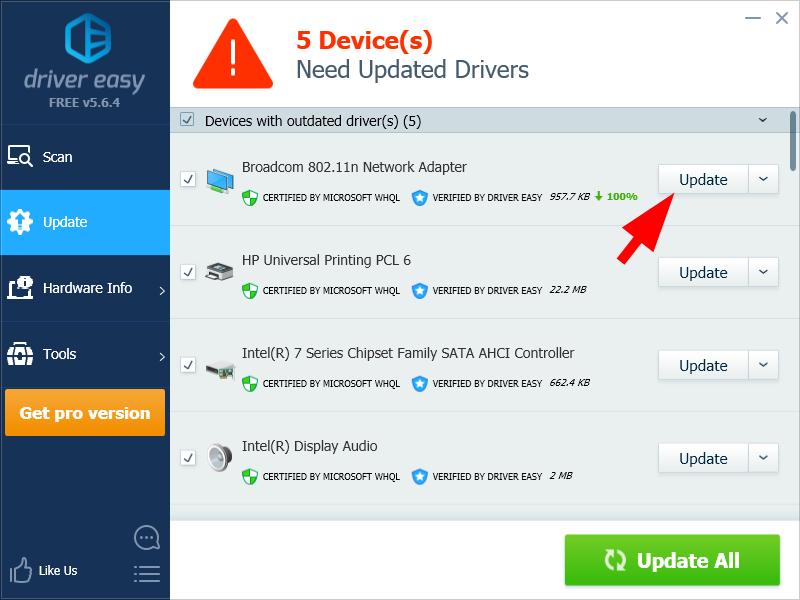
3) Click the Update button next to your network adapter to automatically download the correct driver for your computer, then you can manually install it. Or click Update All to automatically download and install the correct version of all the drivers that are missing or out of date on your system (this requires the Pro version – you’ll be prompted to upgrade when you click Update All).
If you have any issue with Driver Easy, please contact Driver Easy’s support team at support@drivereasy.com for advice. You should attach the URL of this article so they can help you better.
Method 4: Change Scan Valid Interval
You can also increase your Scan Valid Interval to fix your wireless network issue.
Scan Valid Interval is the amount of time before your network adapter looks for a better network access point after reaching a threshold. The higher its value, the less time the adapter spends to scan for an access point.
To increase your Scan Valid Interval:
1) On your laptop, press the Windows logo key and R on your keyboard to open the Run box. Then type “ncpa.cpl” and press Enter.

2) Right click your Wireless/WiFi network adapter, then click Properties.

3) Click the Configure button.

4) Select the Advanced tab, then click Scan Valid Interval. Change its value to 120, and click OK.
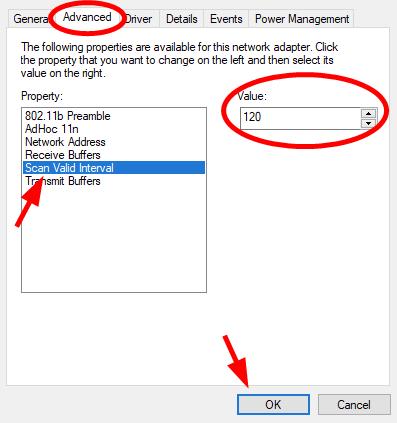
We hope one of these fixes works for you. If you have any questions, leave us a comment below.
Note Sumber Driver Easy
Logitech G430 Mic Not Working [Fixed]
Posted by free on August 12, 2018 with No comments
Is your Logitech G430 microphone not working? You’re not alone. Many people have reported the similar issues. But don’t worry, you can fix the Logitech G430 mic not working issues.
How to fix Logitech G430 mic not working
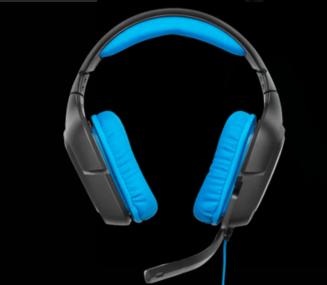 If you’ve troubleshooted the hardware and tried plugging your mic into different USB ports, and your mic is still not working, try the solutions below:
- Allow access to microphone (for Windows 10 users)
- Update your audio driver
- Check your sound settings
- Reinstall Logitech Game Software
Note: the screenshots below come from Windows 10, and the fixes also work on Windows 8 and Windows 7.
Fix 1: Allow access to microphone (for Windows 10 users)
If your Logitech G430 microphone stops working in Windows 10, the first thing you should check is to turn on the microphone access. Here’s what you need to do:
1) On your keyboard, press the Windows logo key and I at the same time.
 and I at the same time.
2) Click Privacy in Settings.
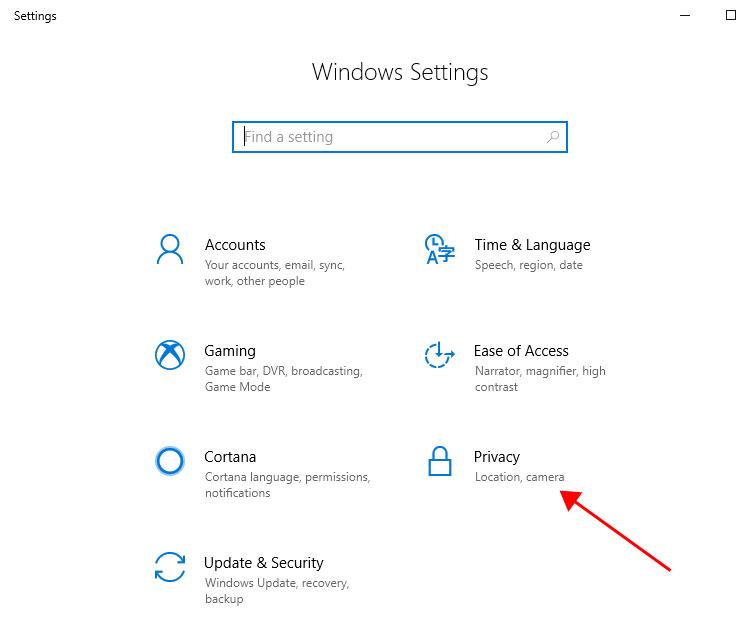
3) Click Microphone on the left pane, and make sure Microphone access for this device is on.
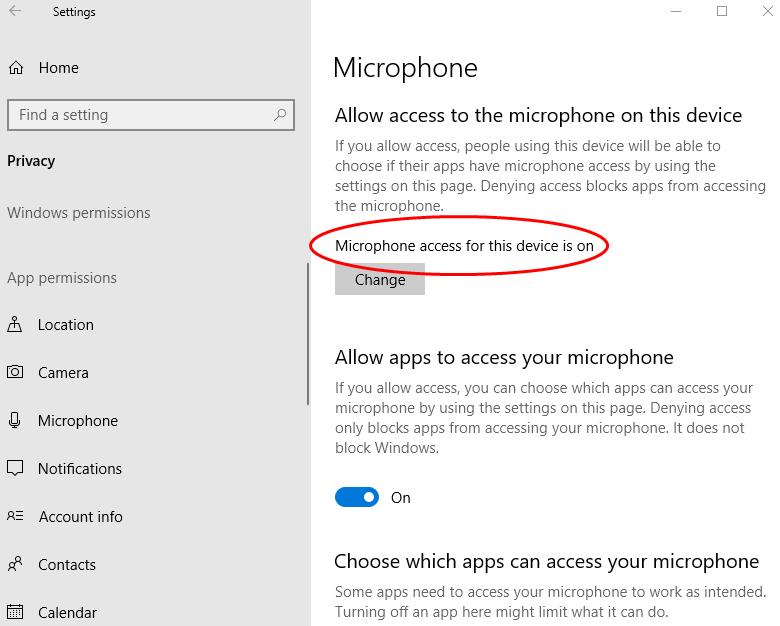
(If this issue happens in the voice chat when you play games, you can also check if the microphone status for that game is ON.)
Re-plug your microphone again to see if it works.
Fix 2: Update your audio driver
A missing or outdated audio driver in your computer can cause your Logitech G430 mic not working, so you should verify and keep your audio driver up to date.
There are two ways to update your audio driver: manually and automatically.
Manually update your driver: you can go to your sound card manufacturer’s website, search for the latest version of your sound card driver, and install it in your computer. This requires time and computer skills.
Automatically update the driver: if you don’t have time or patience, you can do it automatically with Driver Easy.
Driver Easy will automatically recognize your system and find the correct drivers for it. You don’t need to know exactly what system your computer is running, you don’t need to risk downloading and installing the wrong driver, and you don’t need to worry about making a mistake when installing.
You can update your drivers automatically with either the FREE or the Pro version of Driver Easy. But with the Pro version it takes just 2 clicks (and you get full support and a 30-day money back guarantee):
1) Download and install Driver Easy.
2) Run Driver Easy and click the Scan Now button. Driver Easy will then scan your computer and detect any problem drivers.
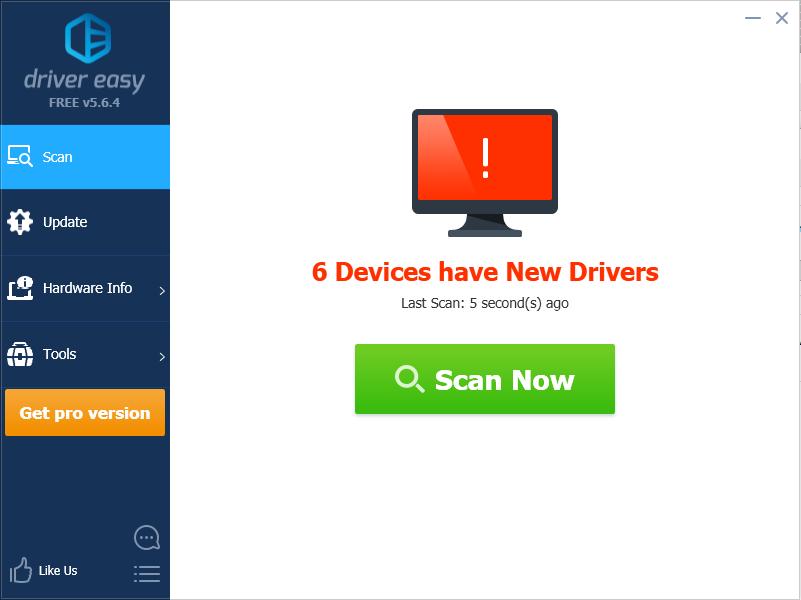
3) Click the Update button next to the flagged sound card to automatically download the correct version of their driver (you can do this with the FREE version), then install it in your computer.
Or click Update All to automatically download and install the correct version of all the drivers that are missing or out of date on your system (this requires the Pro version – you’ll be prompted to upgrade when you click Update All).
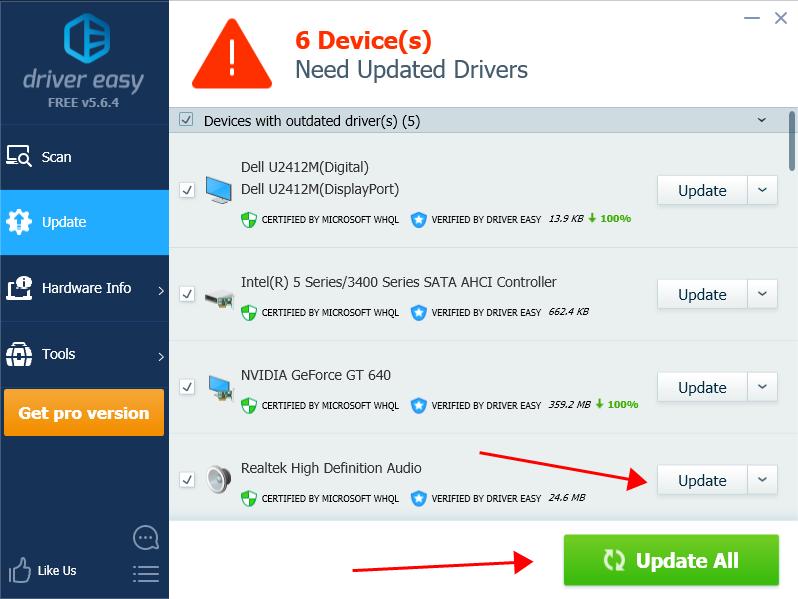
4) Restart your computer to take effect.
Try your Logitech microphone again to see if it works now.
If your issue still persists, don’t worry. We have other solutions for you to try.
Fix 3: Check your sound settings
Your Logitech G430 mic may not work because it’s disabled or not set as the default device for your Windows computer. Follow the steps below to check your sound settings:
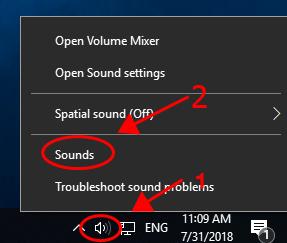
1) Right click the volume icon at the bottom right corner on your desktop, and select Sounds.
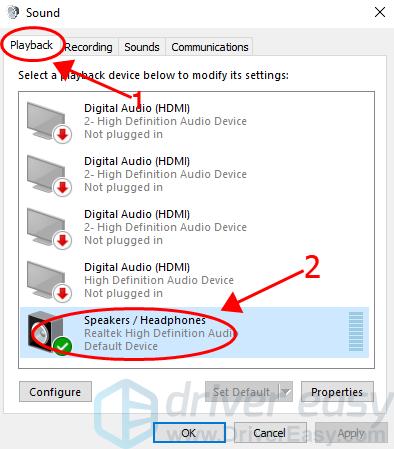
2) Click the Playback tab, and make sure to set your microphone to Default Device.
3) Click the Recording tab, then right click on any empty area inside the device list and select ShowDisabled Devices.
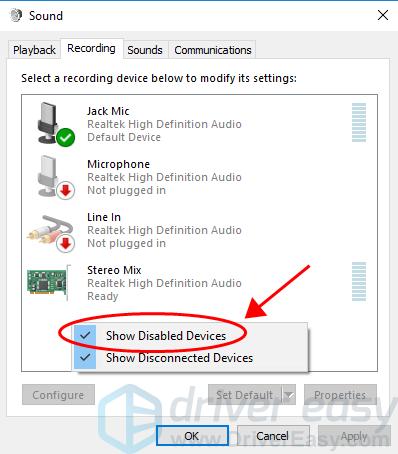
4) Right click your microphone and click Enable (if it’s enabled, you’ll see Disable).
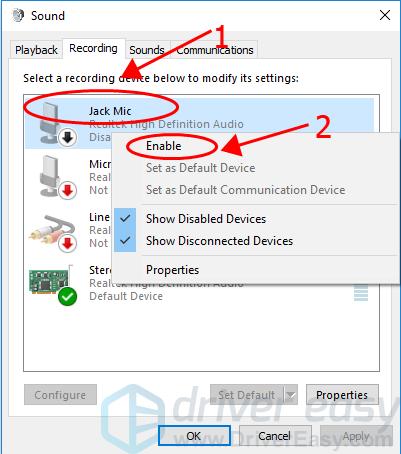
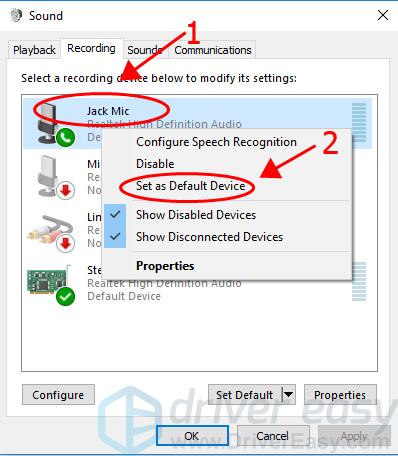
5) Right click on your microphone again and select Set as Default Device.
6) Right click your microphone, and click Properties.
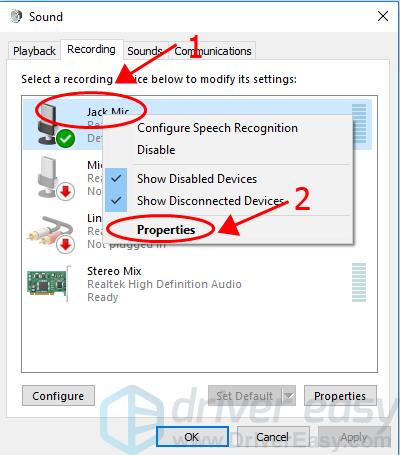
7) Click the Levels tab, and drag the volume slider to maximum.
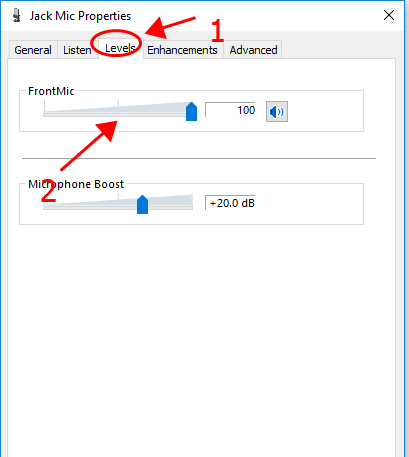
8) Save your changes and restart your computer.
Try your Logitech G430 mic again and see if it works.
Still no luck? Okay, there’s one more thing to try.
Fix 4: Reinstall Logitech Game Software
This is tricky but it works for many people who have the similar issues. So you can give it a try.
Simply uninstall Logitech Game Software from your computer, and install the latest version of the Logitech Game Software to your computer. Then see if your Logitech G430 mic works.
Note Sumber Driver Easy
USB composite device is an older USB device [SOLVED]
Posted by free on August 12, 2018 with No comments
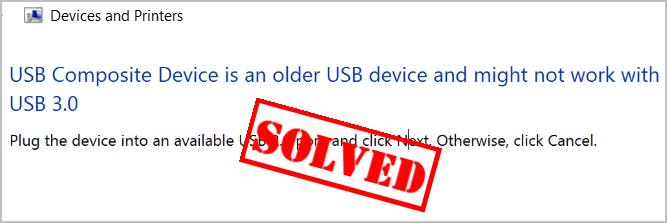
If you keep getting the above message when trying to connect your printer, or any other USB composite device, to your Windows PC, you’ve come to the right place, as this guide will help you solve the issue, quickly and easily!
There are 3 solutions to your USB composite device issue. You may not have to try them all. Just work your way down the list until you find the one that works.
3 solutions you can try:
- Update USB composite device drivers
- Uninstall and reinstall USB controllers
- Use Windows USB Troubleshooter
Solution 1: Update USB composite device drivers
USB composite device errors are mostly driver errors. Updating your USB driver should always be your go-to option when something goes wrong between your USB composite device and your PC.
There are two ways to update USB drivers:
Way 1 – Manually update your USB composite device driver
You can go to the manufacturer’s website of your USB composite device, find the exact USB driver for your device, and install it on your Windows PC.
You’ll need some computer skills and patience to update your driver this way, because you need to find exactly the right driver online which should be compatible with your Windows OS, then download it and install it step by step.
You’ll need some computer skills and patience to update your driver this way, because you need to find exactly the right driver online which should be compatible with your Windows OS, then download it and install it step by step.
Way 2 – Automatically update your USB composite device driver (recommended)
If you don’t have the time, patience or computer skills to update the USB composite device driver manually, you can do it automatically with Driver Easy.
With Driver Easy, you don’t have to search and find what drivers needed in your PC, nor to update drivers step by step. It can considerably help with almost all the issues related to drivers.
Furthermore, you can update your USB composite device driver(s) automatically with either the FREE or Pro version of Driver Easy. It only takes 2 simple clicks with the Pro version (and you will get full support and a 30-day money back guarantee).
1) Download and install Driver Easy.
2) Run Driver Easy and click Scan Now. Then Driver Easy will scan your computer and detect any problem drivers.
2) Run Driver Easy and click Scan Now. Then Driver Easy will scan your computer and detect any problem drivers.
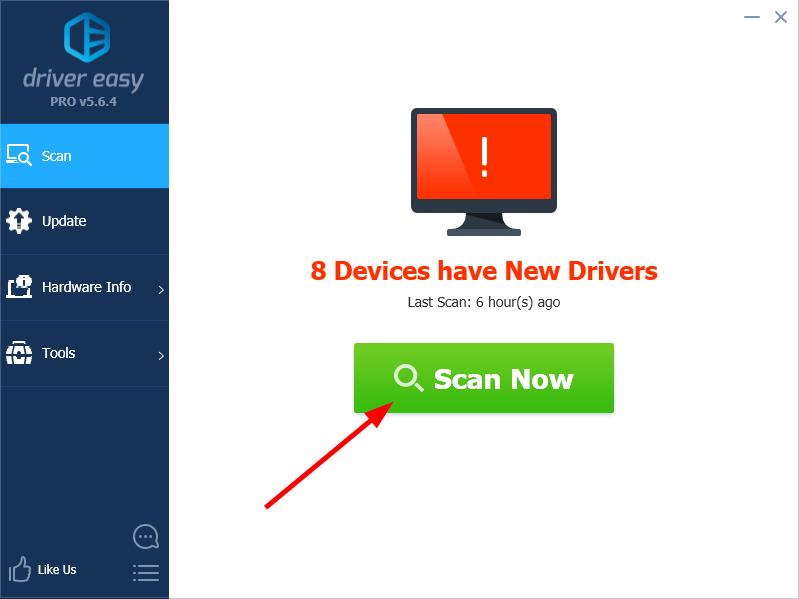
3) Click the Update button next to the driver name to download and install the correct driver (you can do that with the FREE version).
Or click Update All to automatically download and install the correct version of all the problem drivers (you can do that with the Pro version, and you will be prompted to upgrade when you click Update All).
Or click Update All to automatically download and install the correct version of all the problem drivers (you can do that with the Pro version, and you will be prompted to upgrade when you click Update All).
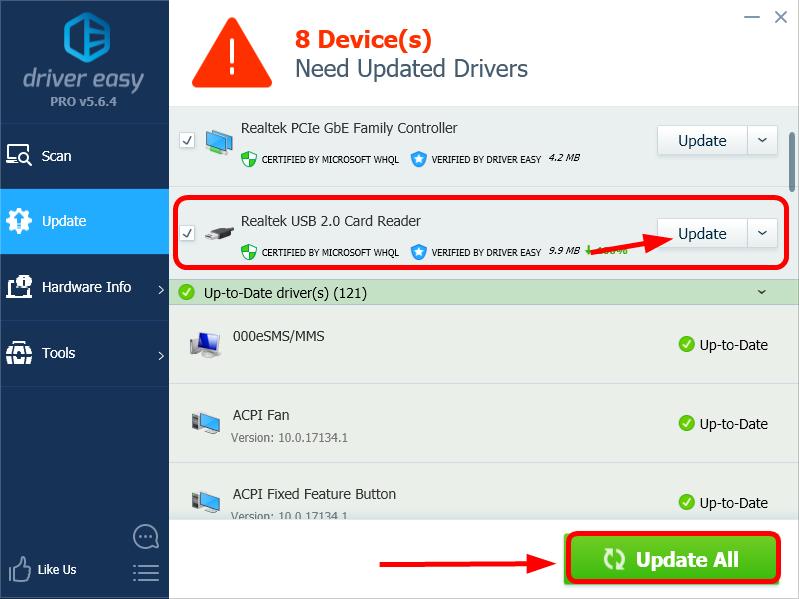
4) After updating the driver(s), restart your PC, and test if your USB composite device works now.
This should solve your USB device problem. If the issue continues, don’t worry. There’re two more solutions you can try.
This should solve your USB device problem. If the issue continues, don’t worry. There’re two more solutions you can try.
Solution 2: Uninstall and reinstall USB controllers
If the first solution wasn’t successful, then you can try uninstalling and reinstalling the native USB drivers via Device Manager. This action will allow Windows to automatically scan for hardware changes and reinstall the correct drivers again automatically. Here’s what you need to do:
1) On your keyboard, press the Windows logo key  and R key simultaneously to open the Run box.
2) Type devmgmt.msc and press Enter.
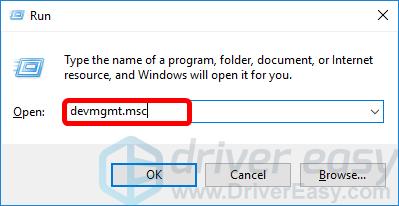
3) In Device Manger, scroll all the way down to find Universal Serial Bus controllers and expand the entry.
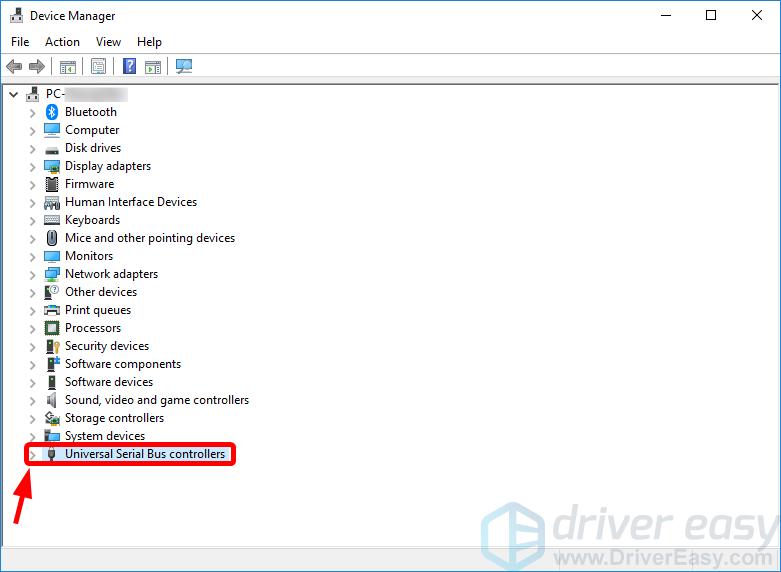
4) Under the entry, right-click on the first USB device and select Uninstall device to remove it.
Important: Make sure you’ve saved/backed up your files on your PC before you click Uninstall device, because you might need to force shutdown and restart later.
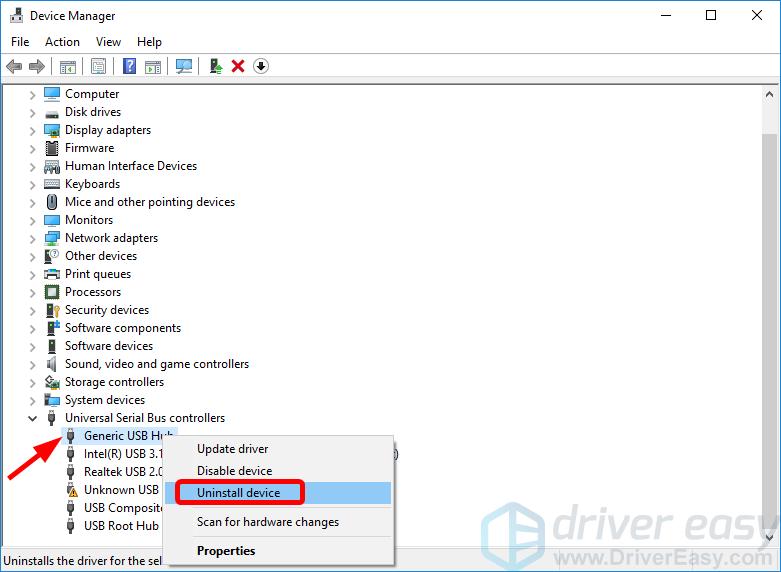
5) Repeat the procedure with every USB device that is listed under the Universal Serial Bus controllersentry.
Note: Some USB devices may closely relate to your wired mouse, keyboard etc, which means uninstalling those devices will make them not working, don’t worry, just temporarily. As long as Windows restarts again, it will reinstall the correct drivers again automatically.
6) Once you’ve uninstalled them all, restart your PC.
If your mouse or keyboard is not working for now, you may need to force shutdown: you can press the power button of your PC for a few seconds until it begins to shutdown. And then, press the power button again to restart your computer.
7) When your PC finishes restart, plug your USB composite device into your computer through a USB port and see if it’s able to work.
Solution 3: Use Windows USB Troubleshooter
If the above didn’t prove helpful, now you can turn to the Windows USB Troubleshooter.
To use it, firstly, you’ll need to download the tool from this official link.
Then you can open the tool and follow the on-screen instructions to troubleshoot.
These are the best 3 solutions to fix the “USB composite device is an older USB device” issue in your Windows PC. If you have any questions or need any help, feel free to comment below and we’ll see what more we can do to help.
Note Sumber Driver Easy
Subscribe to:
Comments (Atom)


